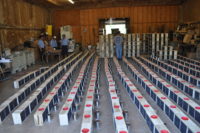
Before picking up your package(s) or Nuc(s) from Warm Colors Apiary, have all equipment for a one-story hive assembled, painted, and on a hive stand.
Locate your hive(s) using the following criteria:
- Wind break on the Northwest side (Western Massachusetts) to protect from winter winds.
- Water should be available within 1/4 mile. If bees are close to your neighbor, place a container near your hives to keep bees from using water from sources in neighboring yards and swimming pools.
- Leave extra space behind and on the sides to work on your hive. 4-6 feet is a comfortable work space.
- Allow for air drainage. Avoid placing hives at the bottom of a hill where cold & moisture can settle. Tilt hive slightly forward to keep rain and snow from running into the hive entrance.
- Orient hive entrance toward south or east. Early sun encourages foraging, and adds warmth to the winter cluster. Full sun is best in the winter, avoid shade.
- Respect and protect the neighbors. Do not place your colony where people walk, or interfere with the bees flight path. Use fences and buildings to redirect bees to fly up and over people. Place hive(s) in an out of site location.
- Set up an electric bear fence before starting the colony. Fence should be at least three feet from hives, or bear can reach over the wires and knock hive over. Place peanut butter or tie some bacon onto fence to bait bears, once shocked they learn quickly not to test the fence.
Hive stands higher than 15 inches will keep entrances out the reach of skunks. Hive stands should be strong (support 400 lbs.), allow for air flow underneath the bottom board, and be stable during wet conditions to avoid tipping over when muddy. Also they should raise the hive to a level making it easy to handle bee boxes and supers without too much strain on the beekeepers back.
After picking up your bees keep them in a cool (50-60F), dark location until you can install the package. Brush or spray light sugar syrup onto the screen, being careful not to drown the bees. Syrup should be room temperature. If conditions are above 80F spray water on bees every 4-6 hours until they can be installed into the hive. If bees are running on the screen they are overheating and must be cooled down or released into the hive, It is always best to get them installed in the new hive as soon as possible.
PACKAGE BEES:
Hiving a Package is best when temperatures are above 60F, sunny with little or no wind. If installing more than one package start later in the afternoon, or early morning and allow time for each one to settle before starting the next. This will minimize drifting and flying between hives as the bees orient to their new location. Bees will often be attracted to the busiest entrance until they become fixed on their new hive. Hiving multiple packages close together can result in all or most bees ending up in one hive. Drifting is reduced once bees have spent the night in their new home.

STEPS to Hiving a PACKAGE:
1) Do not use smoke on package bees. Use a light sugar spray to calm bees and keep them from flying. Sugar calms and feeds them, smoke agitates and confuses them.
2) Use an entrance reducer, and place some grass to keep bees inside until they settle.
3) Place four frames to one side of the hive body.
4) Spray or brush the cage with sugar syrup.
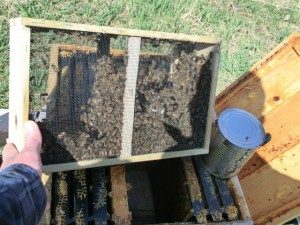
5) Pry wooden cover from cage exposing the Queen cage tab and can of syrup.
6) Remove the Queen cage and confirm she is alive and active. If dead call your bee supplier immediately for a replacement.
7) Suspend the queen cage between two center frames, with screen side facing bees, not blocked by comb or foundation. Bees must have screen access to feed queen and exchange queen pheromone.
8) Shake bees on top of queen cage. Place package cage and remaining bees into open space in hive body. In warm weather you may want to place the cage at the entrance and allow remaining bees to walk or fly into the hive.
9) Dribble can syrup onto bees and frames.
10) Add syrup feeder. A top jar (over inner cover), or division board feeder is preferred.
If using an entrance feeder, you can fill it and have it in place before pouring bees unto queen cage. If working in an established bee yard entrance feeders can start robbing between colonies. Be careful not to spill syrup to avoid robbing by established colonies.
Queens should be kept caged for 4-5 days (including time spent in the package)before removing cork on candy end of queen cage. Ask your supplier how many days have the bees been caged. This will allow workers to exchange queen substance and increase the likely acceptance of the queen. Also feed bees continuously during the introduction period. Avoid unnecessary disturbance of the colony unto the queen has been accepted. This will reduce queen rejection and absconding (abandoning the hive) before workers have setup the brood nest. Consider the Queen accepted when brood rearing has started. Roger Morse taught that queens are not fully accepted until their brood begins to emerge. This would be 3-4 weeks with a package.
The beekeeper should avoid using a smoker, or unnecessary disruptions to the hive during the first few weeks. You will need to know certain things have occurred, but try to move slowly with a minimum of frame removal and handling.
MANAGEMENT SCHEDULE for PACKAGE BEES:
After installing your bees, keep them well fed, and monitor the queen’s egg laying and expanding brood pattern. The following schedule should provide a guide for managing your new hive(s).
DAY 1 -After installing bees and beginning queen introduction. Do not disturb bees. Check that they are taking the syrup. Remove any grass or obstructions from entrance. Look for pollen on foraging bee legs.
DAY 3-4 – Use sugar syrup spray to calm the bees. Confirm the Queen has been released from her cage. Look for eggs on the center frame (the frames most bees are covering). You do not have to see the Queen if eggs are found, if no eggs look carefully look for the Queen. Do not pull more frames then is necessary to confirm a Queen is present and laying eggs. Be quick and do not disturb longer then is needed. Continue to feed syrup, and add a pollen patty once eggs are found.
If no eggs, find the queen and wait a few more days to find eggs.
DAY 7 – If no eggs or Queen, close the hive overnight and check for the queen the next day. Still no eggs or Queen, find a replacement Queen and re-start the process of introduction. A Queen not laying after two weeks should be replaced.
A queen should be laying eggs within two weeks. This is critical as the bees from the original package are aging and will begin dying of old age. Survival of the package or colony is dependent on its ability to grow and expand to a self-sufficient population. Packages will not have new worker members for 4-6 weeks after installation. The sooner a queen begins egg laying, the more likely the hive will stay healthy and thrive.
DAY 10 – After eggs were first confirmed. Check capping’s for worker brood. Cappings appear slightly raised (flat looking) not sticking out. If capping’s look popped up (bullet shaped) they are drone cells and your Queen may require replacement. This can be the result of a poorly mated Queen, or worker bees laying unfertilized eggs.
Queens will lay one egg per cell, in the bottom center of the cell. Drones come from unfertilized eggs. If a queen is present and there are mostly drones cells in the worker sized cells, then the queen is probably insufficiently mated (lacks semen), or has a physical problem fertilizing eggs intended to be fertilized worker bees.
Laying workers will lay multiple eggs in the same cells, and they will be on the sides of the cells. All laying worker eggs become drones, as they do not have the ability to lay a fertilized eggs (lack a spermatheca). They lay eggs on the sides of cells because they have a shorter abdomen then a queen (queen abdomens reach the bottom of the cell). This condition will occur when a hive has gone queen-less for too long. A queen-right colony contains queen pheromone that suppresses laying workers.
WEEK 4-5 – New bees will begin emerging and the hive population will increase. Your package does not grow until new adult bees begin to emerge from the cells (21 days). This is a minimum of four weeks until new bees emerge. Continue to feed & inspect weekly.
Rate of growth will depend on the amount of drawn comb available, number of younger workers (nurse bees), reserve of nectar & pollen, and Queens egg laying ability. In that order.
Syrup is mixed 1 part water and 1 part sugar. You will use 20 pounds of sugar per colony to draw two hive bodies of comb.
Use a pollen substitute to supplement natural pollen. Bees cannot maintain large brood nests, or healthy bees without copious amounts of fresh pollen. Pollen substitute will extend the nutrition of fresh pollen.
NUCS:
Nucs will already be growing in population. If the box looks full transfer to a larger hive body with additional frames. Drawn comb in the frames is preferred, but foundation is fine. A crowded Nuc will swarm if not given more room to grow. Look for Queen cells when transferring the frames. If you see a Queen and eggs cut them out or use them to start a new Nuc. Confirm you have Queen before removing the cups or cells.
Add frame(s) of honey to the Nuc. Sugar syrup if you do not have honey. Leave an empty comb for the Queen lay eggs. Feeding should not be continuous unless the hive has no extra honey and pollen in the comb. Stop when the hive has three capped frames of honey.
Add a second hive body when the first HB has seven frames filled with brood and food. Move a frame of capped brood into the second HB in the center to speed up drawing wax comb and reducing congestion in the brood nest.
Honey supers are added when the first two hive bodies are finished. Stay ahead of the colony’s growth to avoid over-crowding.
What to watch:
- Honey & Pollen reserves.
- Overcrowding can lead to swarming.
- Queen performance.
- Mites & Disease.